Easy Hand Lettering Technique on a Rustic Mason Jar Door Hanger
One of the best reasons to DIY a door hanger is that you get to personalize it with your own style. You always know that your front door decor will be unique! And one of my favorite ways to make a custom door hanger is by adding a personalized family name or favorite phrase to the painted project. However, I know that hand lettering with paint can be intimidating at first, especially if you’re a beginner. So I wanted to share a favorite hand lettering technique for doing the writing by hand on your next door hanger!
Note: Affiliate links included within this post for your convenience. As an Amazon Associate, I earn from qualifying purchases.
Hand lettering can be difficult because you might struggle with writing in a straight line, getting the spacing right, and shaping the look of your letters. So that’s why I recently did a Facebook live showing one of my favorite lettering tips – how to use tracing paper & graphite paper to get the text just right!
Supply List
- Tracing Paper
- Graphite Paper
- Uni Posca 2.5mm Bullet Point Paint Pen
- Fine Point Sharpie
- Pink Eraser
- Pencil
To get started, you’ll need a door hanger that is painted and ready for your lettering. In my facebook live, I painted this rustic mason jar door hanger. (And if you love the mason jar and aren’t ready to DIY it, you can buy one that I’ve already painted for you right from my shop!)
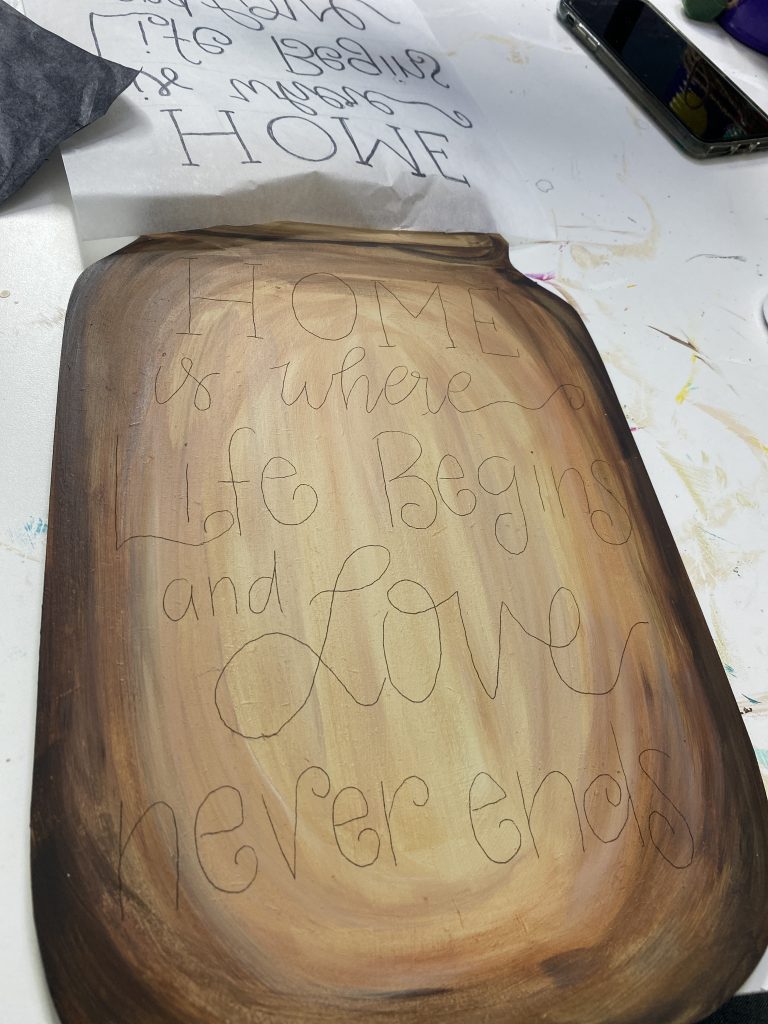
If you don’t already have a door hanger in mind, try the mason jar! Just grab the ready-to-paint blank or printable template and digital cut file from my shop. I know that if you follow my steps below, you can easily do your own hand lettering. But if you aren’t quite ready to try, you can even buy a blank mason jar that is etched with the phrase I did on mine: “Home is Where Life Begins and Love Never Ends”. Then it’s as easy as filling in the blanks like a paint-by-number!
Steps for Hand Lettering Success:
Step 1: Place tracing paper on your door hanger and write out the lettering with a pencil. Erase, make adjustments if needed so that the words all fit just as you want them on the door hanger.
Step 2: After you’ve got the lettering the way you want it, go over your pencil with sharpie on the tracing paper so it’s easier to see and trace.

Place Your Lettering
Step 3: Put a piece of tape at the top of the tracing paper to hold it in the exact spot you want.
Ready to Transfer!
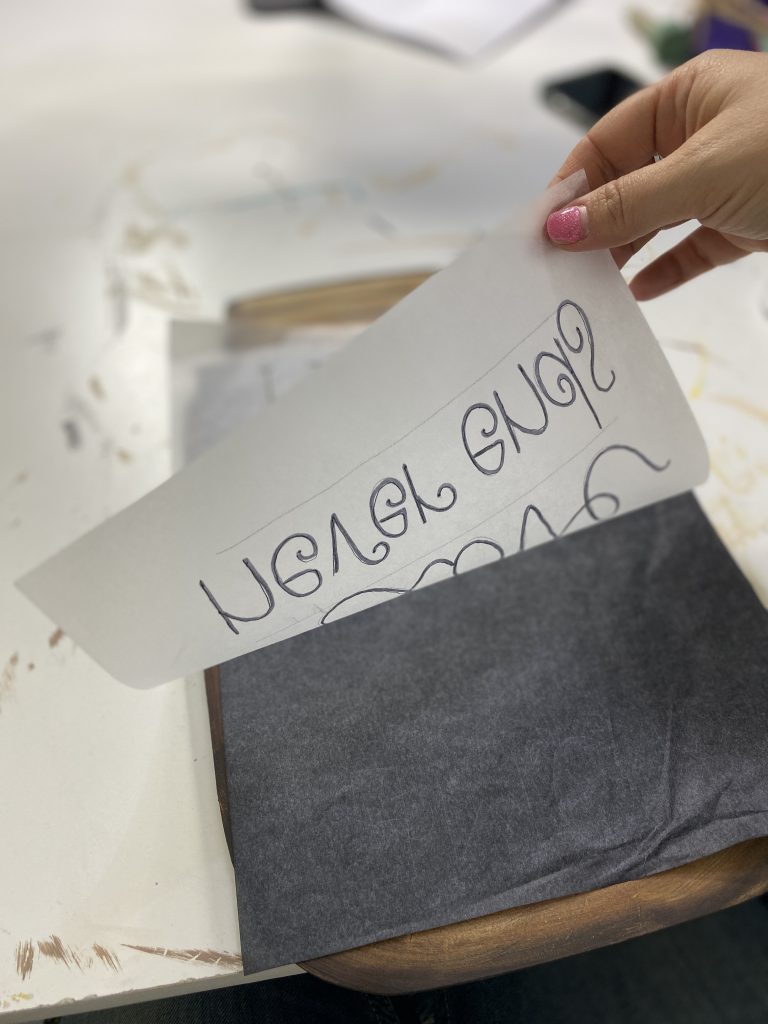
Step 4: Swing it up like it’s on a hinge, slide the graphite paper beneath it. Lay the tracing paper back down on the graphite paper
You want the graphite paper to cover the area under the tracing paper completely. That will make it easier to transfer.
Next Step in the Hand Lettering Technique:

Step 5: Next, use a pen to trace over your lettering once more. This transfers the letters to your door hanger.
Step 6: Remove the tracing & graphite paper. Use a paint pen (Uniposca 2.5mm bullet tip) to trace over the design. Make sure to thicken the downstrokes of the letters for a faux calligraphy look.

Here’s a quick video where I show you how I used my paint pen to begin writing on the door hanger. I added extra thickness and lines to embellish the letters.
https://app.searchie.io/watch/gRqm3rRxD1
Step 7: Sit back and marvel at your beautiful lettering!….Oh and erase any stray graphite with a pink eraser before sealing. Voila – your own custom handlettered door hanger!
Watch Each Step of My Hand Lettering Technique!
If you already follow me on facebook, you might have already watched this painted lettering video tutorial when I did it live.
But if not, take a look! You can watch each step and I’ll show you exactly how to do this easy hand lettering technique. If you want to see the entire process, hop on over to my Facebook page and watch the entire video. Plus, as a bonus, I also show you how to paint that rusty, antique-looking rustic style on the mason jar! It’s one of my favorite painting techniques to give the door hanger that aged, vintage feel.
I promise you can do your own lettering, even if you’re a beginner! If you’re still intimidated, try practicing different designs on a scrap piece of wood, or play around with different ideas on your tracing paper for the door hanger.
Hand lettering is a lot of fun and really gives you that extra custom feel to your door hanger projects. It can even be relaxing and therapeutic once you’re comfortable with the technique. There are also lots of creative hand lettering and calligraphy books that can help you practice new fonts and styles, and build your confidence. Then it’s easy to transfer your text right onto your painted projects!
Of course, if you’re looking for a very specific font style or design, you always have the option to use a stencil for your words and phrases. I have several available in my shop to help you create that perfect look.
Find It In My Shop:
Mason Jar BlankEtched Blank
Previous
Next
Featured Products
Get the Help and Inspiration You Need!
Make sure you follow me on Facebook, Pinterest, and Instagram to get even more ideas, video tutorials, links to my favorite products, and lots of other fun stuff!
Have you signed up for access to my FREE template gallery? Sign up and you’ll get access to download some of my favorite door hanger templates – for free!
And don’t forget about our Painters’ Clubhouse! Once you join, you’ll become part of a monthly membership group where we paint and learn together! From new techniques and painting tips, to getting access to exclusive content all month long, it’s the best place to grow your painting hobby together with us! Make sure you get on the waiting list so that you’ll be one of the first to have an opportunity to grab a spot when membership opens again.other


0 Comments