
I am so excited to share this tutorial with you today! If you remember back in the summer, we painted a 3D door hanger that said “Hello Summer” and had little daisies all over it. You can actually read about that cute door hanger in this blog post. That door hanger was such a hit that when I found this “Hello Fall” door hanger design I knew I had to paint it with you too!
Supply List
DecoArt Americana Paint Colors:
- Deep Burgandy
- White
- Black
- Canyon Orange
- Marigold
- Santa Red
- Hauser Dark Green
- Hauser Medium Green
- Hauser Light Green
- Neutral Grey
- Grey Skies
- Dark Chocolate
Note: Affiliate links included within this post for your convenience. As an Amazon Associate, I earn from qualifying purchases.
Paint the Background
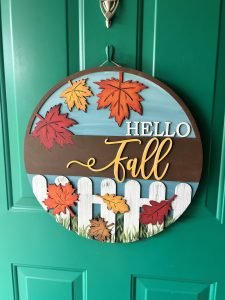
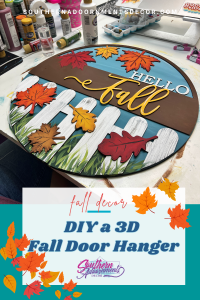
This door hanger actually has a lot of pieces involved. To start we are going to use a sponge to paint the background using the color Open Water. I wanted an ombre effect here to make it look more like the sky so I added white paint to the top of the door hanger and blended it so that the background got darker as it goes down the door hanger. Are you needing more tips about how to create an ombre effect? You can check out this blog post where I give you step-by-step directions to recreate an ombre pattern for yourself!
Next up is the fence! While painting this live I was unsure of a lot of colors to use on this particular door hanger, however I was certain from the start that I wanted my picket fence to be white. Using the color Grey Sky and a chip brush, dry brush some paint onto your fence to give it the distressed look. I repeated this with a darker grey, called Neutral Grey too!
To paint the grass I started at the bottom of the door hanger with the background color of Hauser Dark Green. You can water down your paint to help create blades of grass too! Pick up Hauser medium green and do the same thing, then finally using the Hauser Light Green, add a few sprigs of color to your top layer.
Painting the 3D Pieces
Now that our backgrounds are mostly painted, it’s time to paint some of our 3D pieces! Some of these pieces are smaller and I have a trick to make them easier to paint. Take some tape and tape it to your table sticky side up. Stick your small pieces to the tape so that they stay in place. I painted my leaves Marigold, Santa red, Canyon orange, and honey brown.
Next, I pulled the large attachment to start painting, the one with the half circle banner and leaves. I started by painting the center leaf Marigold, the one on the left Santa Red, and the one on the right Canyon Orange.
To paint the border area and the center banner I used the color Dark Chocolate. I recommend a half-inch wide flat tip brush for the area around the border and then switching to a larger brush for the center area. Next, we’re going to paint the word “Fall” that goes on top of that center banner with the color Marigold. Using your tape for this step will save you a lot of headaches too, just be careful when you pull the letters off the tape as they are fragile. I used the sponge I painted the background with on these letters, it makes the process so much easier. Just cut the sponge where the paint was. I repeated this with the word “Hello” in white.
The Final Details
To add some details I dipped an angle tip brush in the color Burgundy and used it to outline the edges of my red leaf. The key to shading along these edges is using a sprayer bottle of water on the small leaves to attach. Use Dark Chocolate to accent the Sable Brown. Pull your brush from the side to create that shading technique. For the orange, mix a little bit of brown with the orange paint! I added some dark chocolate lightly feathered onto the leaves throughout the process to add the accent lines and it really changed the entire look.
We’re finally ready to glue! Using Stick-Fast Glue, glue down all the pieces of your door hanger. Sometimes it’s good to use little clamps or clothespins to hold the larger pieces down while they dry. You want to make sure that you are applying pressure across the whole thing. Once everything is glued down, start to add some grass along the bottom of your fence using the same green colors that you started with. Finally, using a thin paint brush and black paint add some wispy lines to your door hanger and details. The finished product is so much prettier than I even imagined! I love it so much and had such a great time painting it with my community on Facebook!
Watch the Replay
I painted this fun door hanger live on my Facebook page. If you weren’t there to paint it live with me you can watch the replay on my YouTube Channel. I don’t have the templates available for this door hanger as this isn’t an original design of mine. However, you can purchase a blank of this piece in my shop!
Related Resources
- Shop more products in my online shop!

0 Comments