
Supply List
DecoArt Americana Paint Colors:
Note: Affiliate links included within this post for your convenience. As an Amazon Associate, I earn from qualifying purchases.

What is Creative Fabrica?
Creative Fabrica is a website where you can purchase and download fonts, clipart, cutting files for Cricut and laser cutting machines. You can purchase these one by one or you can pay for a membership that gives you access to fonts, clipart, and cutting files for free! I have an exclusive offer for you today, you can use my personal link and get a trial period where you can download ten things for free. They also allow it to be used for commercial use, meaning if you use it to create a design you want to sell, you can!
Painting the Hello Summer Door Hanger
I got my inspiration from how to paint this design from the listing of the cut files on Creative Fabrica. Let’s get started! First, pour some Sable Brown and Fawn paint on the background of the wooden door hanger and use a sponge to cover the background. I love using car sponges from the Dollar Tree to cover backgrounds, it covers so fast! Let that background dry and base coat your daisies using the color, White. You may need to add a second coat.

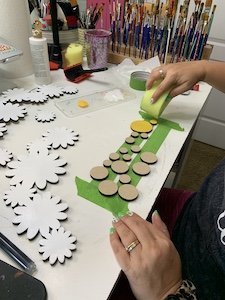
Painting the Intricate Details
To paint the daisy centers, lay some tape sticky side up and tape it down to the table. Stick the tiny pieces to the tape so that they are much easier to paint. Using the color, Primary Yellow, and a sponge, paint the centers of the flowers. Remove the small pieces and add the lettering to the tape so that you can paint it using that same Buttermilk Yellow. For the word “Hello” put your sponge in half-white and half-yellow paint and dab it on the word.
Adding the Wood Grain to Your Door Hanger
Using the color, Dark Chocolate, and a paint brush paint over the background of your door hanger. You can do this messily because this is where we will be adding the wood grain effect. Using the wood grain tool, go along your door hanger while that paint is wet. Dry once you have applied this to your door hanger.

Glue Down Your Attachments
Lay your words and daisies on your door hanger background to see how you want it laid out. I used Power Flex Gel to glue down my attachments. Once the attachments are glued down, your door hanger is ready to hang and enjoy!

Watch the Replay!
Are you ready to join me over on Creative Fabrica and get tons of designs and inspiration for your next project? Once you have this design you can watch the replay below and recreate it for yourself!
Related Resources
- Create an account with Creative Fabrica!
- Shop designs in my shop!

0 Comments