
Supply List
- “Faith Can Move Mountains” Template
- 1/2 inch flat tip brush
- One inch flat tip brush
- Artistro Acrylic Paint Markers
- Acrylic Frame
DecoArt Americana Paint Colors:
Note: Affiliate links included within this post for your convenience. As an Amazon Associate, I earn from qualifying purchases.

Getting Started on Our DIY Acrylic Frame
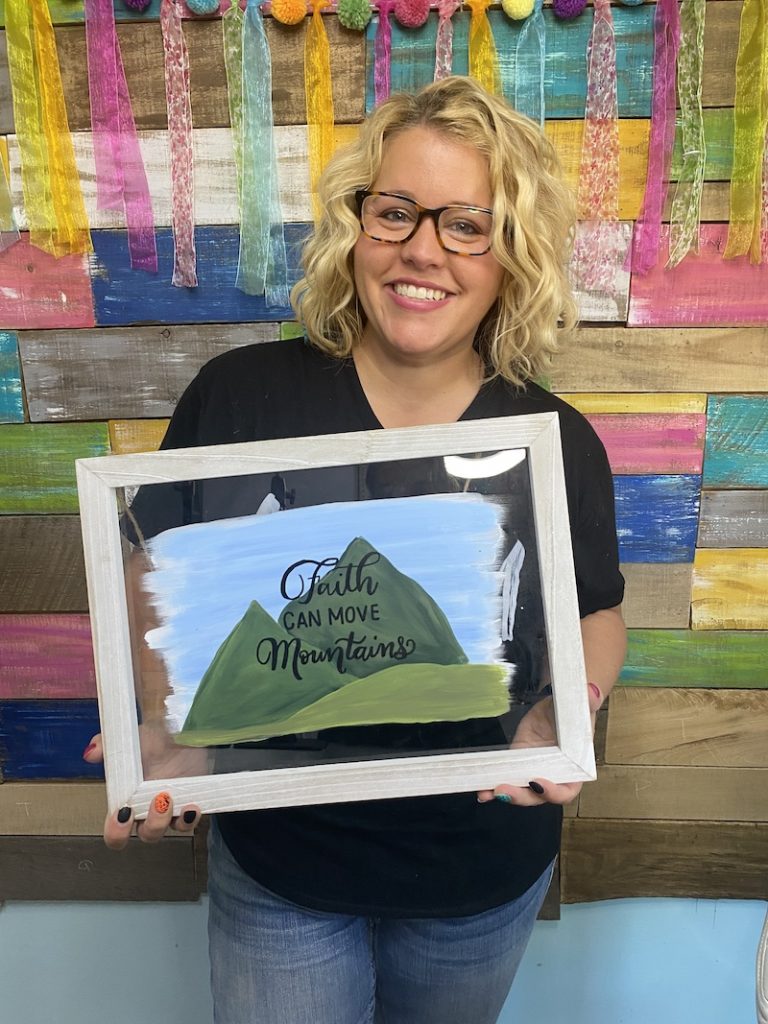
I have had so much fun doing these template remakes where we take a door hanger template and use it for a completely new creation! We’ve made a shelf sitter for my tiered tray, a block sign for Valentine’s Day, and today I’m going to share with you how to use an acrylic frame and add a template to create a painted window look!
I got my 16” x 12” acrylic frame from Hobby Lobby for only $9.99 and I’m using my “Faith Can Move Mountains” template to add to the top. I printed the 12 inch sized template and scaled it down to 70% so that it fit best on my frame. I’m not going to add the circle that is around the design on my frame today, but I will be using every other detail that is in the design.
To start, I am painting a white background on my acrylic. I am not painting the entire acrylic piece, but I am painting a section and leaving the edges to have feathered brush strokes. Once that’s dry add a second coat so that the white is not transparent. Using the color Provence Sky and a one inch flat tip brush, start to paint the sky on top of the white background leaving some of the white edges showing. Gently streak white paint into the sky you were painting to lighten it up and blend it together.
Using Graphite Paper to Trace the Template and Paint the Mountains
Using graphite paper, put the shiny side down on top of the acrylic, then place your template on top. Using a pen, trace the lines on the template that you want to transfer to your acrylic. For this project, I traced everything except the outer circle. I also didn’t transfer the lettering yet, I’ll come back to that, once I’m done painting the mountains!
Let’s start by painting our mountains! Add the color Hauser Dark Green and Avocado to a smaller flat tip brush to paint the first mountain. Start with the outside edges then paint in the inside. Mix up the colors until you like the way that it looks. To paint the second mountain, switch to Hauser Medium Green and paint the entire mountain. Once that first base coat is down on the mountain, streak Hauser Dark Green into that mountain you just painted on the left. I wanted to lighten mine up after it was painted so I added the Hauser Light Green to add some lighter greens. The final lower mountain, I used the color Hauser Light Green to fill it in. I then toned it down with the color Light Avocado. The key to making your mountains look more true to their natural color is to pick up the different green paint colors and paint in your mountains.

Add Lettering to the DIY Acrylic Frame
Dry your paint really well and then grab your graphite paper again and place the shiny side down. Using an ink pen, trace the words on the template so that they transfer to your acrylic. Using a Black Artistro Paint Marker, start painting over the lettering that you just traced. Don’t forget to make your down strokes a bit thicker. Once you’ve finished your lettering you’re officially done with this project! What do you think?
Catch the Replay
If you loved painting the template design on this acrylic frame, you could paint another design on the back side of the frame and have a reversible sign. That’s two pieces of decor in one, how convenient! You could also go purchase acrylic pieces that fit into the frame and paint a scene for different seasons. Then you could have interchangeable artwork for each time of year, I love that idea!
If you missed the original video of me painting this DIY acrylic frame, check it out below!
Related Resources
- Shop more templates in my shop!
- Join my Painter’s Clubhouse Membership and learn more techniques and tutorials for painting doorhangers and DIY projects.
- Shop my Amazon Storefront to see a lot of the products I use daily for crafting!

0 Comments