Painted Easter Garland Craft from Dollar Tree

If you follow my blog, you might remember when I made a pumpkin garland banner for fall using wooden craft cutouts from the Dollar Tree. Well, here’s another dollar store DIY crafting hack – how to make a cute painted garland for your Easter decor! It’s a cheap and easy DIY project even for beginners.
And if you’re like me, you’re ready to start decorating for Spring as soon as you take down your Valentine’s decor. So this is a perfect replacement! As you can see, I painted mine with bright Spring pastel colors and fun polka-dot patterns.
Supply List
- Flat Tip Paint Brush Set
- Polka Dot Sponge Brushes
- UNI Posca Paint Pens (3mm in white, 5mm in black)
- Hair Dryer
- Jute Twine
- Mini Clothespins
- Dollar Tree Wooden Easter Cutouts (4 packs total, 1 of each design)
And DecoArt Matte Acrylic Americana Paints:
- Pumpkin Orange
- Medium Hauser Green
- Periwinkle
- Carousel Pink
- Bright Yellow
- White
- Navy
- Razzle Berry
Note: Affiliate links included within this post for your convenience. As an Amazon Associate, I earn from qualifying purchases.

Getting Started with Painting the Easter Garland
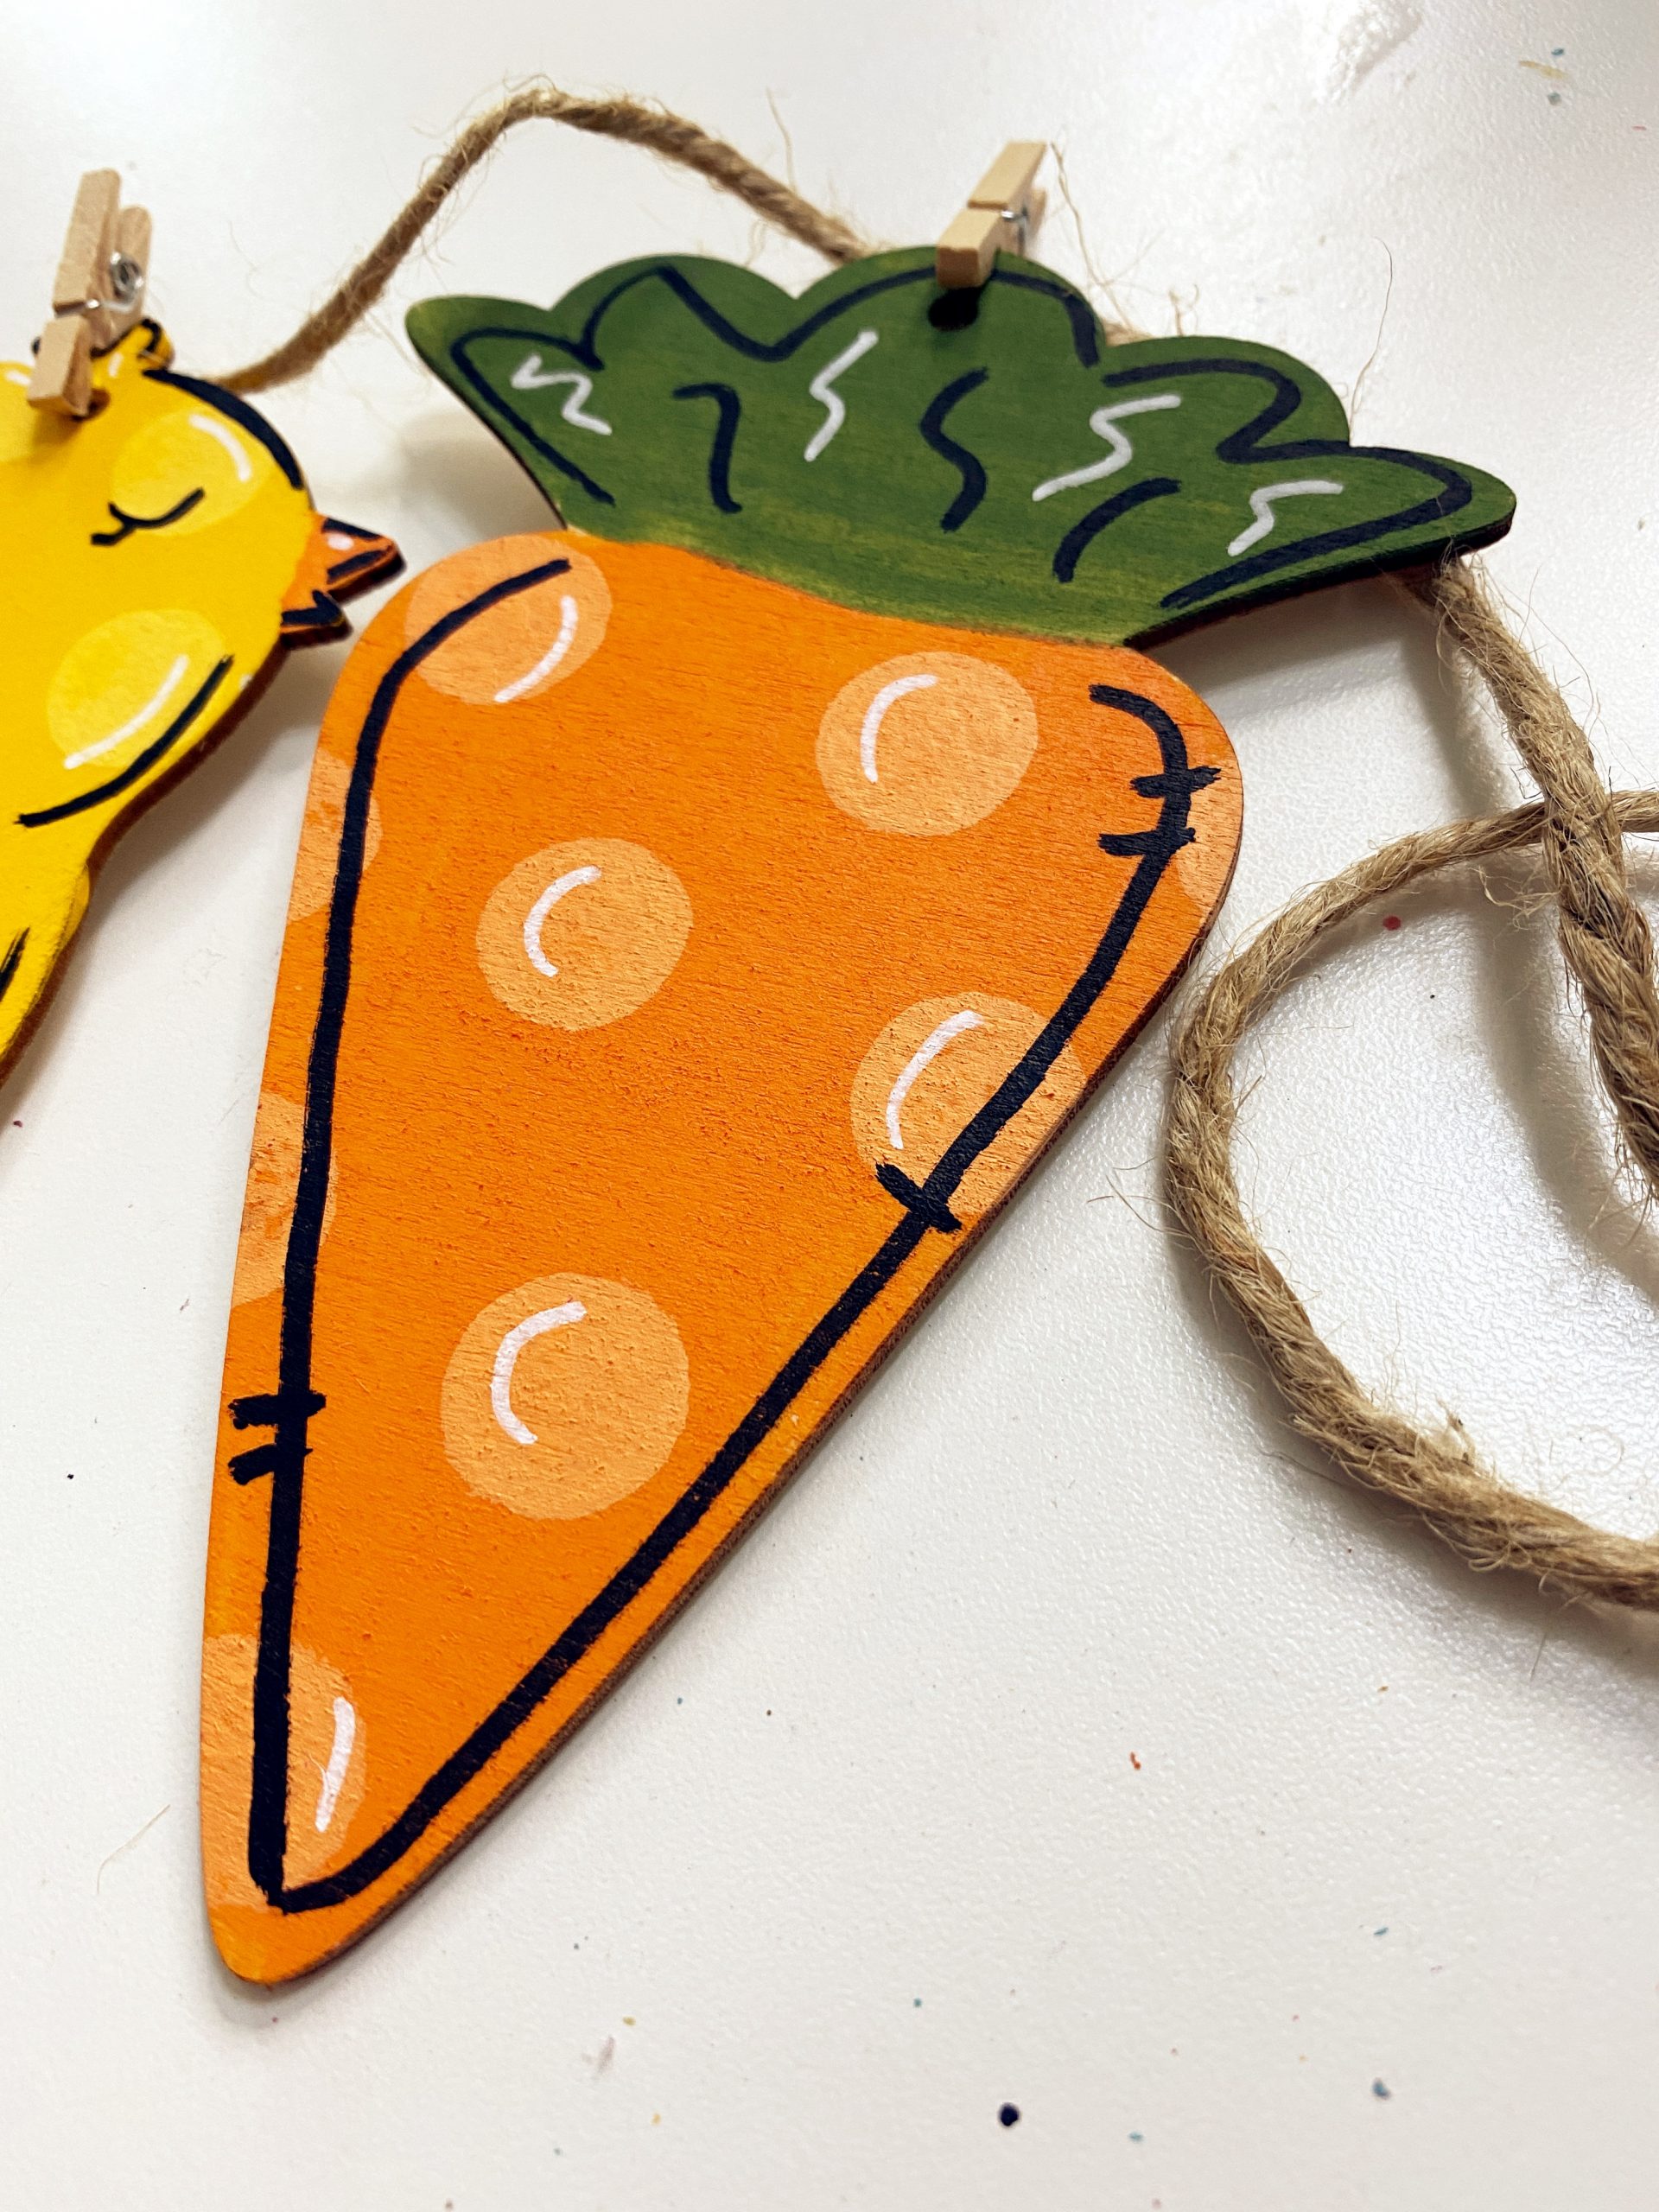
Head to your local Dollar Tree and look for the little packs of wooden Easter cutouts. I bought eggs, carrots, bunny rabbits, and Easter chicks. I bought one of each set to mix and match for a really adorable garland design. I’ll do two of each to make a total of eight along the garland.
I knew I wanted to do some bright polka dot patterns, but first I needed to get my backgrounds done. So I grabbed a large, flat-tip brush and started painting my carrots orange. Just like a door hanger, I used nice long, smooth strokes. Then I was ready to paint the tops green and set them aside to dry.
TIP: If you loved the Palm Leaf Green from Apple Barrel Paints and wish they still made it, try this Hauser Medium Green from DecoArt Americana!
Next I painted my little bunnies. I started with the darker periwinkle blue and added a little white to mix the perfect shade. Don’t be afraid to experiment with your paint colors and try some custom mixes! The eggs were next, with the Carousel pink color. Finally I did the chicks in yellow, although I left their feet blank to finish in a different color.
I set them aside to dry and get ready for painting the polka dot pattern.
TIP: You can use a hair dryer to speed up the process!
Painting Polka Dot Details
Now for the polka dots!
Starting with the carrots, I added a little white to my original orange color to make a pretty, creamy orange. I used my foam sponge brush to make polka dots with the lighter orange on each carrot.
TIP: To get rid of any bubbles in your polka dots, just blow gently! (You can find even more polka dot painting tips in my recent polka dot blog post!)
On the bunnies, I wanted to do bigger, darker polka dot. So I added some navy blue to my lighter original periwinkle color. I added just a small amount to get the perfect darker periwinkle.


TIP: Try using the handle end of your brush to mix your colors! The paint mixes evenly, and it just wipes right off the end without gunking up your brush.
For my eggs, I picked up a darker pink (Razzle Berry) to mix with the original Carousel Pink, which created a rosy pink that was just a little darker.
Finally, for the chicks, I used the same orange from the carrots to paint their little feet. Next I added white to lighten the original yellow. On the chicks, I used the smallest pouncer – the half inch size – to make the polka dots.
I really like how the polka dot pattern is continued on each piece, but the different sizes and colors add just enough variety!
Highlights and Accents on the Easter Garland
Don’t forget this final touch for your paint projects! Adding highlights and accents gives your pieces a final, polished look. For this Easter banner, I decided to use UNI Posca paint pens in white (3mm) and black (5mm).
TIP: If you’re using paint pens, make sure that your pieces are completely dry first.
First I used the black. I added the details for the eyes and beak to the chick. If you’re intimidated by drawing the eyes, try just painting a closed eye with a little eyelash! Then I outlined the rest of the chick in black.
For the eggs and the carrots, I add little “stitch marks” on the black outline for variety. Then I outlined some leaves in the carrot top. And on the bunny, I did the outline and added a sweet little fluffy tail.
With the white pen, I did some small highlights where it looked like the light might reflect. On the chick and bunny, I added them around the outside. And on the others, I added them to accent the polka dots themselves

Hanging Up Your Painted Easter Garland
Once all your pieces are painted and dry, it’s time to turn them into a garland! Usually you need two small holes to hang pieces on a banner string. But these only had one hole, and I didn’t want to try to add a second one to each piece.
But no problem! Here’s the trick of how I made this Easter garland instead of just stringing through the holes.
First grab your twine and your mini clothes pins. Clip the mini clothes pins to the top of each wooden cutout, then gently string the jute twine through them. Tada – that’s it!
This one really is an easy, fun project. You could even try adding some buffalo check patterns to complement the polka dots.
Or find some of your favorite Easter ribbon and tie it in between each piece to really make it custom for your home decor!
Then all that’s left to do is hang it up! Wouldn’t this banner look cute on your fireplace mantel, dining room hutch, or maybe on a bookshelf or mirror in your entryway? You’ll be getting warm, sunny Spring vibes every time you look at it!

Check Out the Video Tutorial of this Easter Garland
If you already follow me on facebook, I hope you caught my video when I first painted this Easter garland live with my followers. If not, make sure you watch it now and you can see exactly how I painted my polka dot patterns and used the clothespins to hang the banner!
Speaking of Facebook and spring, make sure you follow my page because on March 1st, I will be announcing all of the details of my upcoming Spring Door Hanger Challenge!
Maybe you’ve never, ever painted a door hanger before and just need that extra boost of confidence to try it. Or you’ve painted before, but it’s difficult to find time to be creative and need some inspiration to get back in the swing of things.
Sound familiar? Well, if you’re eager for the motivation and support you need to paint a new door hanger this spring, you’ll definitely want to join this free challenge! You’ll get access to a private facebook group where we will all learn and paint together. I’ll help you find all of the supplies you need, and you’ll even get a discount on the blank for the design we will be painting!
So keep an eye out on facebook for our upcoming March Door Hanger challenge and join in the fun! Or if you know you are ready to take the next step and make creativity a priority for yourself this spring, get on the waitlist now for our monthly Painter’s Clubhouse group. Membership opens again in less than 50 days!
Get More of the Help and Inspiration You Need!
Make sure you follow me on Facebook, Pinterest, and Instagram to get even more ideas, video tutorials, links to my favorite products, and lots of other fun stuff!
Have you signed up for access to my FREE template gallery? Sign up and you’ll get access to download some of my favorite door hanger templates – for free!
Ready for more? Join my new Template Club and get first access to all of my new releases every month, for one low price!
And don’t forget about our Painters’ Clubhouse! Once you join, you’ll become part of a monthly membership group where we paint and learn together! From new techniques and painting tips, to getting access to exclusive content all month long, it’s the best place to grow your painting hobby or door hanger business together with us! Make sure you get on the waiting list so that you’ll be one of the first to have an opportunity to grab a spot when membership opens again. It only opens twice a year – you won’t want to miss it!
Join Our Painters’ Clubhouse Waiting List Now!

0 Comments