
Supply List
- Autumn Pumpkin Blank OR
- Autumn Pumpkin Template
- one inch flat tip brush
- 1/2 inch flat tip paint brush
- crushed glass pieces
- rubber gloves
- resin (1 oz)
- hardener
- cup for mixing
- popsicle stick
DecoArt Americana Paint Colors:
Note: Affiliate links included within this post for your convenience. As an Amazon Associate, I earn from qualifying purchases.

Getting Started
Before we can even get started on this festive glass and resin pumpkin, you should decide if you’re going to purchase the blank from my shop or cut your own blank using the template. If you are new to painting door hangers, I would recommend purchasing the blank in my shop so all you have to do is rip open your package and you’re ready to paint – after you have your supplies of course! Once you have all of your supplies, we’re ready to start crafting!
Painting The Pumpkin with Crushed Glass and Resin
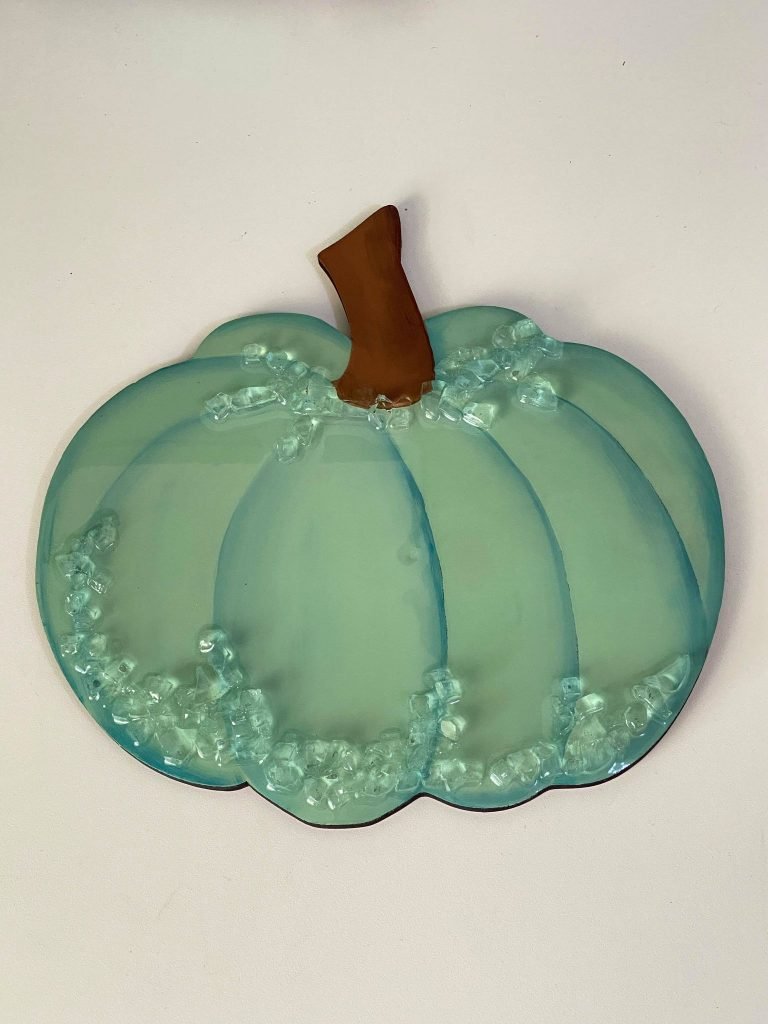
First things first, before we can add the glass and resin to our pumpkin we have to paint it! After gathering your paint brushes, using a one inch flat tip paint brush, start by painting one section or hump of the pumpkin using the color Sage Mint. Dipping the corner of the flat tip brush in the Open Water blue, create a shadow along the edges of your paint on the curves of the pumpkin. Repeat this on each section of your pumpkin. As you finish, use the Open Water to shade on the pumpkin next to the seam along the outer edge.
Once your pumpkin is painted, it’s time to paint the stem! Using a 1/2 inch paint brush and the color Sable Brown, paint the pumpkin stem. Next, dip the corner of your brush in the color Espresso Brown to shade the stem of your pumpkin. You can blend the paint into the pumpkin stem.

Adding Crushed Glass and Resin to the Pumpkin
After allowing your paint to dry, lay out the glass pieces how you would like them to be on the pumpkin. Be sure that you put some gloves on! Mix the resin and the hardener in the cup for 3 minutes. Using a popsicle stick, pick up a bit of resin and drizzle on top of and in between the glass pieces on your pumpkin. Spread the resin out to cover the paint and pieces using your gloved finger. This last step is the hardest, but allow plenty of time for the resin to harden and dry! It’s best to leave it be so it can air dry, try to avoid using a heat gun of hair dryer to dry and the resin sets best on its own.
Catch the Replay
I hope that you loved this tutorial as much as I did! If you missed it on Facebook Live, you can catch the replay below. I love trying new techniques and changing up the look of my finished product. If you try this technique be sure to share it with me on my Made it Monday post on Facebook! I would love to see what you add glass and resin to.
Related Resources
- New to painting door hangers? Check out this blog post that features a guide to painting door hangers for beginners!
- Thinking about cutting your own door hanger and want to learn more about using templates? Check out this blog post!
- Watch more tutorials on my YouTube Channel!

0 Comments